Price: $80.00
Time: 2 hours
Tools: Hacksaw, drill, wire cutter or scissors, socket wrench, screwdriver
Parts: Ford European Focus top and bottom grills (Try BAT), small black zipties
1. Open your hood and remove the plastic cover behind the top grill. It is held in by 4 plastic screws in what is similiar to a sheetrock molly...the screws must be unscrewed in order to pull out the surrounding plastic molly. This is NOT easy as most just spin without unscrewing. Plan to use a screwdriver or whatever else to pry these up and damage them. It's OK they're not too important. Remove the cover, out from under the intake tube and the tabs under the grill, exposing the radiator and turn signals.
2. Remove the wire and bulb from the turnsignals' housing by twisting the back of it about 1/4 turn and pulling out. Use the socket wrench to remove the 4 bolts holding in the top grill and remove it.
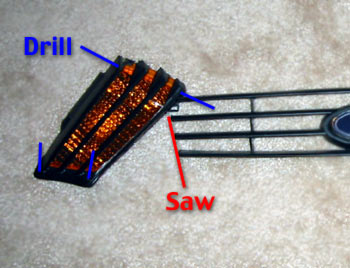
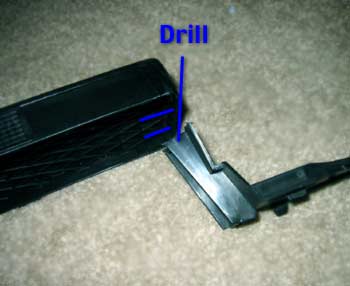
3. Now to cut the turn signals out of the U.S. grill (if you haven't noticed they're molded in there). If you look from underneath you'll notice the plastic get thinner on the horizontal slats just after the amber lens. This is a good place to cut. The extra overhanging black will not be noticable and leaves a place to drill holes. Drill holes in the corners as indicated with a bit the same width as your zipties. Do not ziptie the lights to the grill yet.
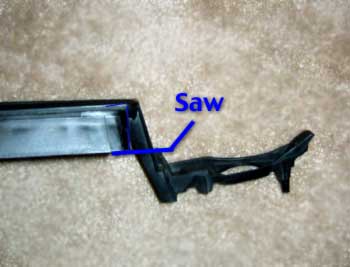
4. Install the top euro grill. Only 2 of the original bolts will be used, while the top clips in with a little force. Now you'll notice how the metal and grill are designed to mount the keyed hood release that I wish we had! Place the turn signals behind the grills and find where they sit best. Note there will probably be two tabs on the grill in the way...saw these off. Once you have them seated right mark locations on the top and bottom of the grill (covered by hood) next to the drilled holes in the turn signals, and drill holes in the grill. Now you can ziptie the lights on, but do not tighten the zipties till later.
5. Replace the plastic cover, making sure it sits well. The lights may be too high and prevent the cover's tabs from going under the grill, in which case the top zipties should be loose and the bottom ones tight. When you have everything in nicely, re-attach the bulbs, replace the cover and the screws/mollies. Remember the cover goes underneath the intake opening.
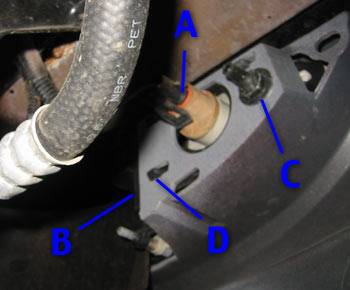
6. Now onto the bottom grill. The US grill also serves as mounts for the foglights, which are not present on the Euro version, so these need to also be removed and attached. First get under the front corner of your car. You should see the rear of the foglight assembly as pictured below. First unclip and pull out the wiring plug (A). Next unclip the side by pulling the side of the clip (B) toward the back of the car. Get the proper-sized socket or a wrench and unscrew the foglight (C). Finally release the tab(s) (D) by pushing them up and in.
7. On the outside your foglight should now be loose, however may not come right out. Behind them you will see the black plastic foglight mount that is actually part of the grill. Pull out on the outside tab until it pops out and you should be able to remove the foglight.
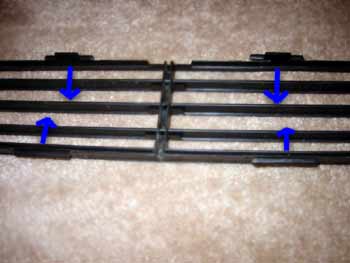
8. To remove the lower grill, there are several tabs that must be released. Pictured below is the removed grill with the tabs indicated. The top middle two are longer and must be released first, easiest by getting underneath, snaking your hand in front of the radiator wind guide plastic, and pulling these tabs down until they pop. The remaining tabs can be done from the outside front of the car again pulling them down (or up) away from the bumper. Once they are all unsecured you can pull the grill forward and out.
9. Place the Euro grill on top of the U.S. grill as pictured below to determine where to cut off the mounts as indicated. This plastic is much softer and easier to cut than the top grill. Drill holes as indicated to ziptie them togeather but again do not tighten them until everything is mounted at the end. You will also need to drill holes behind where the vertical mounting pieces from the bumper go into the grill...drill horizontally as far into the grill as you can so you can insert a ziptie in there without stopping the vertical bumper piece, and later bend it around and secure it in. Sorry I do not have a picture of these. Because the euro grille is curved more than the U.S. it will want to pop out in the middle, I put two zipties on the middle and one behind each side vertical mount.
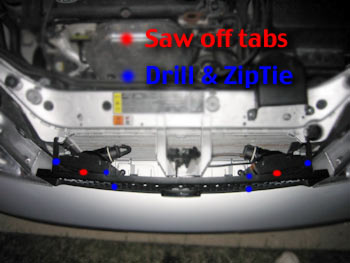
10. Snap the new grill in, you will notice it does not want to stay in on its own in the middle. Once the two foglight mounts are in, go and tighten all the zipties. Remount the foglights, careful to put the outside tab in first, then snake the metal clip through the other side or else it will get stuck. Re-connect everything from behind. Use wire cutters or scissors to clip of the excess ziptie ends. Below is pictured where all ziptie locations should be.
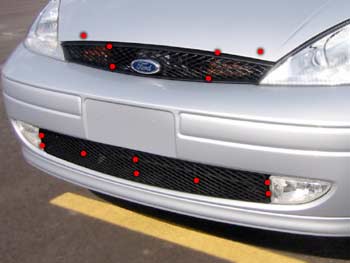
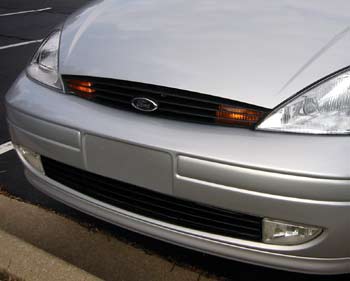
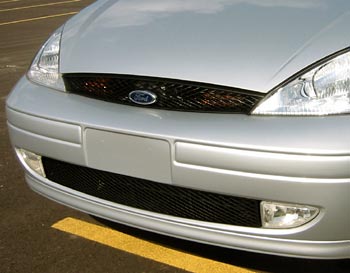
Before & after
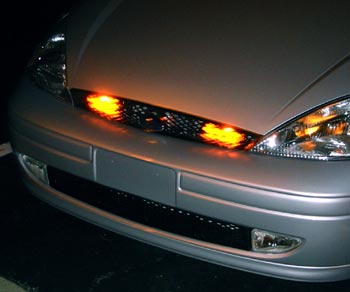
With lights on