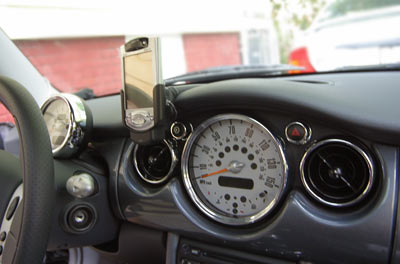
MINI added an option to 2005 models for Chrome Line Interior, which adds chromed bezels to most items in the car. I got a sneak peek at the new MINI Convertible at MINIs On Top and saw just how great the chrome goes with anthracite interior. I decided to retrofit it into my MINI as soon as parts were attainable. Aftermarket parts have been available for a while but have been insanely overpriced and at a lower quality; for example all of these items from Moss would total $395us!
Parts:
Order from your dealership parts department:
(2) Dash Air Vent Rings 51 45 7 132 399 $13.70us each
(1) Speedometer Bezel 51 45 7 132 400 $13.70us
(2) Dash Button Bezels 62 10 6 936 278 $17.80us each
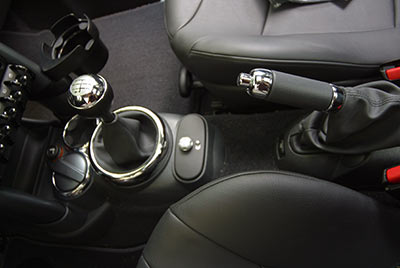
(1) Cup Holder Ring 51 16 7 127 915 $11.30us
(1) Gearshift Ring 51 16 7 131 186 $11.30us
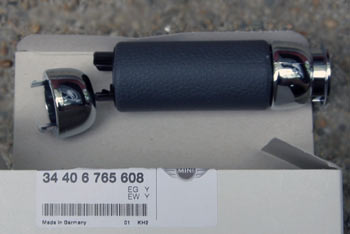
(1) Handbrake Grip 34 40 6 765 608 $26.50us
Order from an aftermarket catalog:
(1) Chrome tach COVER (not ring) $30.50us at minispeed
Tools:
Torx20, small flat-head screwdriver, hot glue gun
Time:
1-2 hours
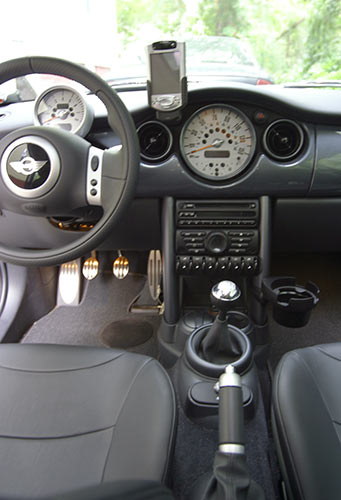
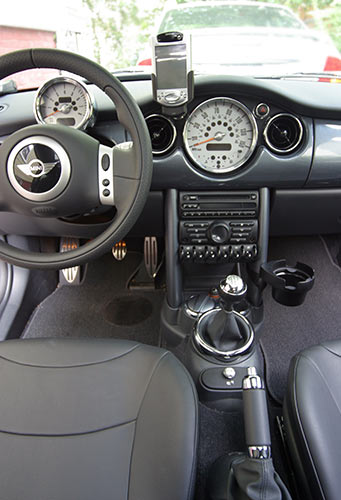
Before & after:
You may not wish to install every available part so follow only the instructions needed.
Tachometer/Rev Counter Cover
Unfortunately the entire tach is one expensive MINI part. You would not want to pay for the whole thing just for the plastic chrome bezel, so you must buy this aftermarket. Fortunately this is the easiest install. The cover just pushes over the existing tach face. You may want to use glue but it should fit snugly enough to hold on its own.
Dash Air Vent Rings
Remove the old vent rings by pushing and turning just a few degrees CLOCKWISE. Replacing them will be a little tough as you need to line them up properly, you can simply push and turn counter clockwise until they stop and hold. Wait to replace these until after the speedo has been completed.
Dash Button Rings
These simply pull off. Make sure the new ones are aligned properly and they push in. Wait to replace these until after the speedo has been completed.
Speedometer Ring
Because the speedo has several clips around it, and in all but the oldest of MINIs is also hotglued from the back, you will most likely not be able to pry this off. You must remove the center dash face. There are 3-4 angled torx20 screws as well as clips holding it in. Two screws are obvious at the top by the buttons. Open the glove compartment, and pop open the plastic under the steering wheel, there will be at a screw underneath at least on one side if not both. Remove all screws. I also loosened the top dash to add some clearance, there are two torx screws behind the panels on the sides by the door, remove screws from just one side, then simply pull up on the dash and it will pop out of its clips.
Next is to pull the center dash face panel from the bottom towards you. Watch the edges of the plastic face so they do not scrape the finished face of the neighboring pieces (air bag cover). It will pop out of several clips. Additionally, remove the interior-colored plastic face from the flat black back by popping it out of clips.
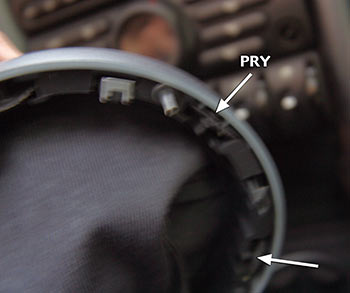
Now you should have the center dash panel removed. From the back, you will see six clips around the circumference of the speedo. You should also notice they are secured with hot glue:
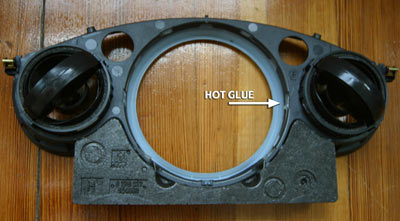
Using a hot glue gun and a screwdriver, reheat the glue and pry out the clips. Try to remove the excess glue. Press in the replacement speedo ring, making sure all clips are secure. I also added some new hot glue...they must have it there for a good reason!
Reverse the whole process to reassemble, again being careful that the plastic interior-colored front plastic does not scratch and gets behind the neighboring pieces. Once it is back together, install the button and air vent rings.
Take a moment to enjoy your new chrome-accented dashboard!
Cup Holder Rings
This is really just one piece and simply prys up started with a small screwdriver. Transfer the rubber piece from the old to the new ring. Pressing the new one in place was a little tough, simply align it then quickly smack it into place.
Shift Boot Ring
Be careful of the vinyl shift boot as it wears and tears easily. Grab the ring from the inside and pull up, it will pop out. Take note on its position, because the pegs at the bottom it will only fit back in one way. From underneath you will see it is actually one ring inside the other, you need to separate and replace the outer ring. You will find tabs that have small walls on either side--these are the ones you need to stick a screwdriver in to unlatch the two pieces. There are several around the ring:
When placing the new ring make sure the boot is in the correct orientation in relation to the ring, and remember the different-sized pegs when pressing everything back into place.
E-Brake Handle
The two chrome pieces along with the grip are all one MINI part number, make sure you have all three in the box when picking it up from the dealer:
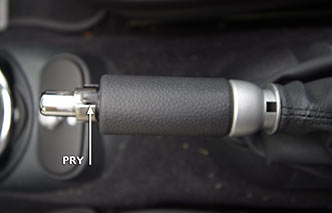
To remove the tip piece from the handle, use a small screwdriver to push in from the right side to release an inner tab. Then do the same on the left side. The tip piece should now pull off.
Very carefully remove the e-brake boot by prying it up and rolling it back from the top, and working it around both sides to the bottom. Be careful as the vinyl wears and tears easily.
To remove the grip (which is also attached to the rear piece), insert a small screwdriver as shown from the side to pry up the clip:
Once it is bent up use your fingernail to lift the front of it and release it. Then simply pull the hand grip forward and off. When replacing the new handle, make sure it is properly aligned with the tab on the top. Make sure the new tip has one tab to the right, two to the left, and press till both sides lock in. Carefully pull the boot back onto the back and you are done!
You've now successfully added Bling to your console!