Many aftermarket storage bins are available for the unused area under the stereo, forward of the cupholders. For 2005 models, MINI added its own solution. It is suprisingly cheap and easy to add this to a pre-'05 MINI.
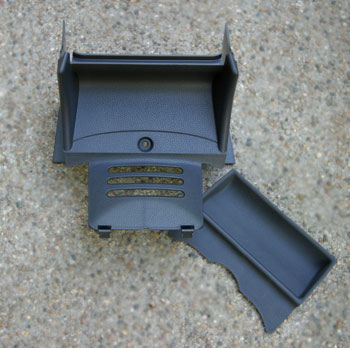
| Parts: Order from your dealer parts department (1) Utility Box 51-16-7-121-738 $13.25us (1) Rubber Insert 51-16-7-125-693 $7.56us
Tools:
Time: |
|
NOTE: Some people were able to force the pieces out between or from the sides of the tubes without removing the tubes. These instructions include removing the tubes for easy removal and replacement.
1. Remove items from cupholders, including ash tray. Remove phillips screw in bottom of each cup holder. This will loosen the front of the center console.
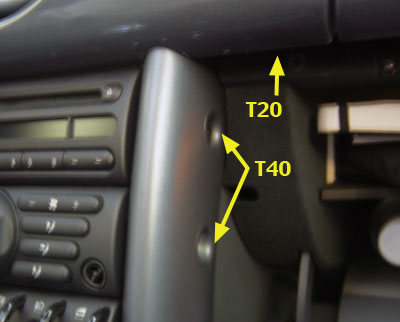
2. Remove the two T40 screws from each side of the center downtubes. You will need to open the glovebox and pull down the driver knee bolster (tilt the steering wheel up, and pull out on the plastic underneath, it will pop out). Remove the T20 screw under the dash just to the right of the right downtube.
3. Now pull out on the bottom center of the plastic dash, under the speedometer, so it pops out about an inch. Then work each downtube out towards you, while pulling the dash up so they clear underneath it. You can now remove the downtubes.
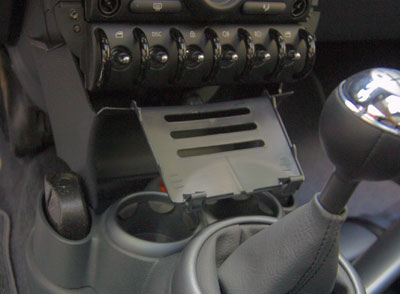
4. Unscrew the T20 screw in the middle of the current plastic piece under the center switches. There are two clips toward the front you may have to release. We're replacing this, so add it to your pile of MINI collectibles!
5. Here's the trick to getting the new piece into place. Note the old piece is rigid plastic, the new one is easily pliable. The top vented piece should be bent about 90 degrees. Slide the new part under the switches, almost upside-down, as pictured, and roll it into place. Once it's approximately where it should be, lift up on the center console, and slip the lip of plastic from the new part underneath. It's simpler than it sounds. Make sure the top clips are in place, and screw in the T20 screw previously removed.
6. Now for the tough part. The rubber piece. This just drops in place. That's right, it just sits there.
7. Reassemble the downtubes etc. You're done!