Josh Wardell’s MINI Cooper S

May 22, 2006

Snapped Wheel Stud

Filed under: — Josh Wardell @ 9:40 am


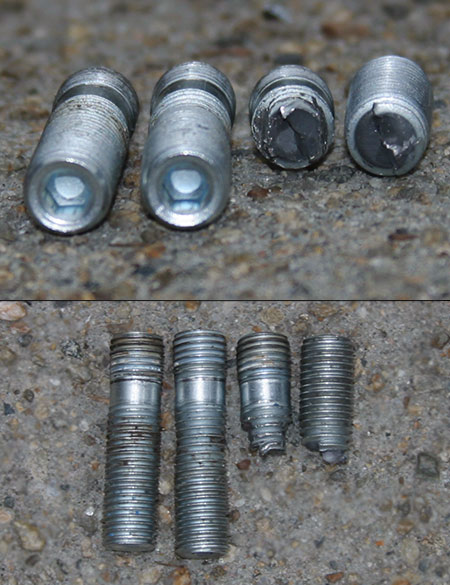
Just when you think the worst is over, something else happens. After two nights spent freeing my wheels from rust, Saturday I finally had the time to mount the new wheels, which I expected to now be an easy half-hour job. As I mentioned, during this process I also took the opportunity to change the wheel bolts to studs and lug nuts. When tightening down the last wheel using my torque wrench, two of the lugs would never get tight enough and seem to just keep going with only a medium amount of torque. and then…BANG! and some rust shavings fell to the ground. I thought I had stripped or even shattered my wheel hub. I removed the wheel to find everything seemingly OK. I pulled on the stud to see if it had stripped, when it came apart in my hands.

Now I was in trouble: the stud had snapped off with not much more than a nub sticking out from the rotor. I tried a pipe wrench, vice grips, and a number of things, but I just didn’t have enough surface area to get a grip on it to unscrew it out. I couldn’t put the wheel back on with a missing bolt..and I had a long drive that I was already rushing to leave for. I started contemplating my poor car getting dragged out on a flat bed when I started thinking out of the box. Finally, it came to me. I took my ever-useful Dremel and grinded down two sides of the bolt flat. Then I was able to get a grip on it with the vice grips and unscrew the bolt. It was one heck of a scare and proves yet again that even the easy jobs-like the 1-hour job of changing your seasonal wheels–can turn wrong in so many ways. And you can never have too many tools!

The metal inside the break looked especially soft. Then, I noticed that the other bolt in that wheel that wouldn’t tighten didn’t look like the other bolts: it was thin in the middle. It looks like there was a defect in the forging of these two bolts, resulting in a stretch in the middle that makes them slightly longer, thinner and weaker in the middle, and the threads are stretched and wider spaced. When the nut reached this section, it tried to squeeze those threads into their proper place, and the weaker center could not handle it and snapped. These were quality Gorilla-branded wheel studs and lug nuts but it proves you need to take a second to inspect things before you put them to use. Now I’m a little nervous about the rest of the studs and I might just return them all to the stock lug bolts. Click on the photo above to see a normal stud, the second faulty stud that has a thin center, and the two halves of the snapped stud.

May 18, 2006

Removing Rusted-On Wheels

Filed under: — Josh Wardell @ 11:27 pm

With the first break of our weeks of rain on Wednesday, I attempted to switch my snow tires off and mount my summer wheels. With a $20 2-ton trolley jack this process usually only takes me an hour. Of course nothing ever goes easy for me. It’s common that after a winter of snow and salt, the rims are a little rusted on, and usually need a good kick to come off. But for the best of me, I could not get 3 out of the 4 wheels to budge. I even loosened the bolts to finger-tight and drove around the block, cornering and braking. These suckers were good as welded. I gave up after several hours wasted, but at the end of the night I drove over to Home Depot and bought the newest tool for my car: an 8-pound long-handled sledge hammer!

After a late day of work Thursday, I ventured out at 9pm with my ever-useful LED headlamp flashlight to make another attempt. To make a long story short, I was still at it till 11pm when I finally got that last wheel free. But I had to try several times over and combine several techniques. Here’s what I had to do, in case it happens to you too:

-Squirt WD-40 in the seam between the rim and the hub, give some time for it to penetrate.
-While on the ground, loosen the bolts a turn.
-Jack up the car.
-Loosen the bolts so they are about a quarter inch away from the rim.
-Place a board of wood (I had none so instead used a 1-inch thick phone book) on the ground at the bottom of the tire.
-Hit the wood/phone book with the sledge, centered at the edge of the rim (not just hitting the tire).
-Try kicking the wheel at 3, 9, and 12 o’clock.
-If the wheel doesn’t budge, repeat a few times, re-spray with WD-40, drop the car, and move on to the other wheels.
-When you have tried once on all the wheels, drop the car and move it so the wheels have turned half way.
-Repeat all steps again as needed.

Once the wheel budges a little, even if it does not pop off, you can now squirt more WD-40 behind the gap, and kick around the circumference to loosen it, then one more hit with the sledge should free it. I should also say to only hit with the sledge medium-hard, you don’t want to screw up your alignment!

Once the wheel is off, I scrubbed the face of the hub and rim with steel wool and WD-40, as well as the inner hub. Ideally, applying a layer of anti-sieze compound before mounting the next wheel would also be a good idea.

I also took the opportunity to replace the stock bolts with lugs and studs with a Lug Nut Conversion Kit from PiloRacing. I used the shortest length and chrome open type lugs so they would still fit under the center caps of my X-lites. I also used LockTite Threadlocker Blue on the inner threads of the studs so they stay put. These not only look much nicer than the stock bolts, but make future changes much easier as you don’t have to line the wheels up perfectly and insert bolts while holding up the wheel.

May 8, 2006

One Lap of America

Filed under: — Josh Wardell @ 8:23 am

Two of our local MINI friends, Joe Rose and David Thibodeau are competing in this year’s One Lap of America. If you remember the old cross-country Cannonball Run from Brock Yates and Car and Driver magazine, this is the current version of that race. Instead of simply racing along public roads as fast as possible, it involves track racing and other events at various destinations around the country.

You can follow along the race since it started this past weekend as they post to their blog on sooper.us. Live updates are posted from the road via their Blackberry. You can also view photos on their Flikr photostream, and they will eventually have videos posted of their track racing as well. You might be able to read about them in Car and Driver in a few months but it is much more fun to follow along live!

They are also carrying the famous Quack Quack Jack duck, in memory of Ed Smith/MaxaMini. It had just finished a tour of many MINI friends in Europe and was quickly shipped over to join Sooper in OneLap. You can follow QQJ’s travels on this MINI2 thread.

This is also a good opportunity to mention another local MINI friend, Pete Basiliere, who just opened a new local MINI parts store and tuning shop, Oxford Motorsports. Pete is sponsoring a big part of Dave & Joe’s One Lap race.

Joe, Dave, and Sooper are facing some stiff competition, include two other MINIs, so wish them luck!

Powered by WordPress